Completing the Pipeline
🏁 Completing the End-to-End CI/CD Pipeline
Congratulations! You’ve successfully set up the AWS CodePipeline infrastructure with CloudFormation. Now let’s make it come alive by triggering the pipeline and watching the entire workflow in action.
🚀 The Power of GitOps and DevOps with AWS and Docker
Before we start making changes to our application, let’s understand why CI/CD pipelines are so valuable in modern software development:
GitOps: Infrastructure as Code
GitOps is a set of practices that uses Git as the single source of truth for infrastructure and application code. With GitOps:
- All changes are made through pull requests
- Git provides audit history and rollback capabilities
- Infrastructure changes are declarative and version-controlled
- Automated systems ensure the deployed state matches the desired state
DevOps: Breaking Down Silos
DevOps brings together development and operations teams to deliver software faster and more reliably:
- Shared responsibility for application quality
- Automated testing and deployment
- Continuous feedback loops
- Focus on small, incremental improvements
Better Together: AWS and Docker
By combining AWS and Docker technologies in our CI/CD pipeline, we get the best of both worlds:
- Docker’s containerization simplifies application packaging and deployment
- AWS’s managed services provide scalable, reliable infrastructure
- Docker Build Cloud enables efficient multi-architecture builds
- Docker Scout ensures container security is built into the pipeline
- AWS CodePipeline orchestrates the entire workflow
💻 Triggering the Pipeline with a Modular Development Approach
In real-world scenarios, we need to balance rapid feature development with security requirements. Let’s demonstrate this by working through three key iterations that showcase the power of our CI/CD pipeline:
- First, we’ll update the Home Page to deliver immediate visual value
- Then, we’ll test our security gate with a vulnerable Dockerfile
- Finally, we’ll fix the security issues and enhance the Room Listings page
This approach demonstrates the full development lifecycle, including security validation and remediation.
1️⃣ Iteration 1: Home Page Team’s Update
Imagine you’re on the Home Page team, responsible for the landing page experience. Your team has received feedback that the current home page is too basic and doesn’t effectively communicate the value proposition of the Rent-A-Room service. After a design sprint, your team has decided to implement a modern, visually appealing home page with the following improvements:
- A hero section with a clear value proposition
- Feature cards highlighting key benefits
- Improved call-to-action buttons
- Responsive design for mobile users
As the lead developer on the Home Page team, you’ve been tasked with implementing these changes and deploying them through the CI/CD pipeline. Here’s how you would make these updates:
cd /workshop/Rent-A-Room && \
echo 'import React, { useState, useEffect } from "react";
import { Link } from "react-router-dom";
import BannerImage from "../../images/choosinghouse.svg";
import "./home.css";

const Home = () => {
  return (
    <div className="home-container">
      <div className="hero-section">
        <div className="hero-content">
          <h1 className="hero-title">Find Your Perfect Stay</h1>
          <p className="hero-subtitle">
            Discover unique spaces that feel just like home
          </p>
          <Link to="/rooms">
            <button className="cta-button">
              Explore Rooms
              <span className="arrow">→</span>
            </button>
          </Link>
        </div>
        <div className="hero-image">
          <img src={BannerImage} alt="Room illustration" />
        </div>
      </div>
      <div className="features-section">
        <div className="feature-card">
          <div className="feature-icon">🏠</div>
          <h3>Verified Homes</h3>
          <p>All our properties are carefully vetted for quality</p>
        </div>
        <div className="feature-card">
          <div className="feature-icon">💫</div>
          <h3>Best Prices</h3>
          <p>Find competitive rates for both short and long stays</p>
        </div>
        <div className="feature-card">
          <div className="feature-icon">🔒</div>
          <h3>Secure Booking</h3>
          <p>Your safety and security is our top priority</p>
        </div>
      </div>
    </div>
  );
};

export default Home;' > src/components/home/Home.js && \
echo '.home-container {
  min-height: 100vh;
  background: linear-gradient(to bottom, #ffffff, #f8f9fa);
}

.hero-section {
  display: flex;
  align-items: center;
  justify-content: space-between;
  padding: 6rem 8rem;
  gap: 4rem;
}

.hero-content {
  flex: 1;
}

.hero-title {
  font-size: 4rem;
  font-weight: 700;
  color: #1a1a1a;
  margin-bottom: 1.5rem;
  line-height: 1.2;
}

.hero-subtitle {
  font-size: 1.5rem;
  color: #666;
  margin-bottom: 2.5rem;
}

.cta-button {
  padding: 1rem 2rem;
  font-size: 1.1rem;
  background: linear-gradient(45deg, #2563eb, #3b82f6);
  color: white;
  border: none;
  border-radius: 12px;
  cursor: pointer;
  transition: transform 0.3s ease;
  display: flex;
  align-items: center;
  gap: 0.5rem;
}

.cta-button:hover {
  transform: translateY(-2px);
}

.arrow {
  transition: transform 0.3s ease;
}

.cta-button:hover .arrow {
  transform: translateX(4px);
}

.hero-image {
  flex: 1;
  display: flex;
  justify-content: center;
}

.hero-image img {
  max-width: 100%;
  height: auto;
  border-radius: 24px;
  box-shadow: 0 20px 40px rgba(0, 0, 0, 0.1);
}

.features-section {
  display: grid;
  grid-template-columns: repeat(auto-fit, minmax(250px, 1fr));
  gap: 2rem;
  padding: 4rem 8rem;
  background: white;
}

.feature-card {
  padding: 2rem;
  background: white;
  border-radius: 16px;
  box-shadow: 0 4px 6px rgba(0, 0, 0, 0.05);
  transition: transform 0.3s ease;
  text-align: center;
}

.feature-card:hover {
  transform: translateY(-5px);
}

.feature-icon {
  font-size: 2.5rem;
  margin-bottom: 1rem;
}

.feature-card h3 {
  font-size: 1.25rem;
  color: #1a1a1a;
  margin-bottom: 0.5rem;
}

.feature-card p {
  color: #666;
  line-height: 1.6;
}

@media (max-width: 1024px) {
  .hero-section {
    padding: 4rem 2rem;
    flex-direction: column;
    text-align: center;
  }

  .hero-title {
    font-size: 3rem;
  }

  .features-section {
    padding: 2rem;
  }
}

@media (max-width: 768px) {
  .hero-title {
    font-size: 2.5rem;
  }

  .hero-subtitle {
    font-size: 1.25rem;
  }
}' > src/components/home/home.css && \
git add src/components/home/Home.js src/components/home/home.css && \
git commit -m "Home Team: Enhance landing page with modern UI and features section" && \
git push origin main
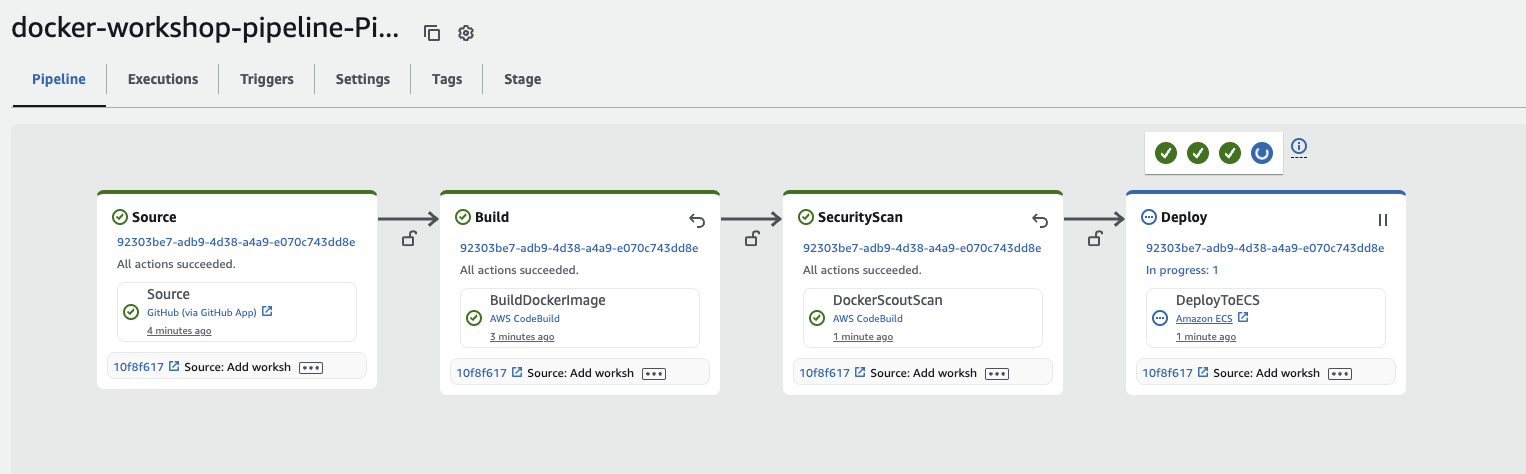
Monitor First Iteration Pipeline Execution
After pushing your changes, navigate to the AWS CodePipeline console to watch your pipeline execute:
echo $PIPELINE_URL
You’ll see the pipeline progress through the Source, Build, Security Scan, and Deploy stages. This demonstrates how changes from the Home Page team flow through the pipeline independently.
Once completed, you can verify the changes by accessing your application URL through the load balancer:
# Get the load balancer DNS name
ALB_DNS=$(aws elbv2 describe-load-balancers \
    --names rent-a-room-alb \
    --query 'LoadBalancers[0].DNSName' \
    --output text)

# Check if we got a valid DNS name
if [ -n "$ALB_DNS" ] && [ "$ALB_DNS" != "None" ]; then
  echo "✅ Application URL: http://$ALB_DNS"
  echo "Note: Your browser may show a security warning since we're using HTTP. Click 'Advanced' and 'Continue' to proceed."
else
  echo "⚠️ Could not retrieve load balancer DNS. Let's check the load balancer status."
  # Get load balancer status
  LB_STATUS=$(aws elbv2 describe-load-balancers \
    --names rent-a-room-alb \
    --query 'LoadBalancers[0].State.Code' \
    --output text 2>/dev/null || echo "Not Found")

  if [ "$LB_STATUS" == "active" ]; then
    echo "Load balancer is active but couldn't retrieve DNS name. Check the AWS console."
  elif [ "$LB_STATUS" == "Not Found" ]; then
    echo "Load balancer 'rent-a-room-alb' not found. Please verify it was created correctly."
  else
    echo "Load balancer status: $LB_STATUS. Please check the AWS console."
  fi
fi

# Check target group health
TG_ARN=$(aws elbv2 describe-target-groups \
  --names rent-a-room-tg \
  --query 'TargetGroups[0].TargetGroupArn' \
  --output text 2>/dev/null || echo "")

if [ -n "$TG_ARN" ] && [ "$TG_ARN" != "None" ]; then
  echo "Checking target health..."
  HEALTH=$(aws elbv2 describe-target-health \
    --target-group-arn "$TG_ARN" \
    --query 'TargetHealthDescriptions[].TargetHealth.State' \
    --output text)

  echo "Target health: $HEALTH"
  if [ "$HEALTH" == "healthy" ]; then
    echo "✅ Your application is running properly and receiving traffic via the load balancer!"
  else
    echo "⚠️ Your targets may not be healthy. Check the target group in the AWS Console."
  fi
fi
📸 Home Page Transformation
Let’s see the impact of the Home Page team’s changes:
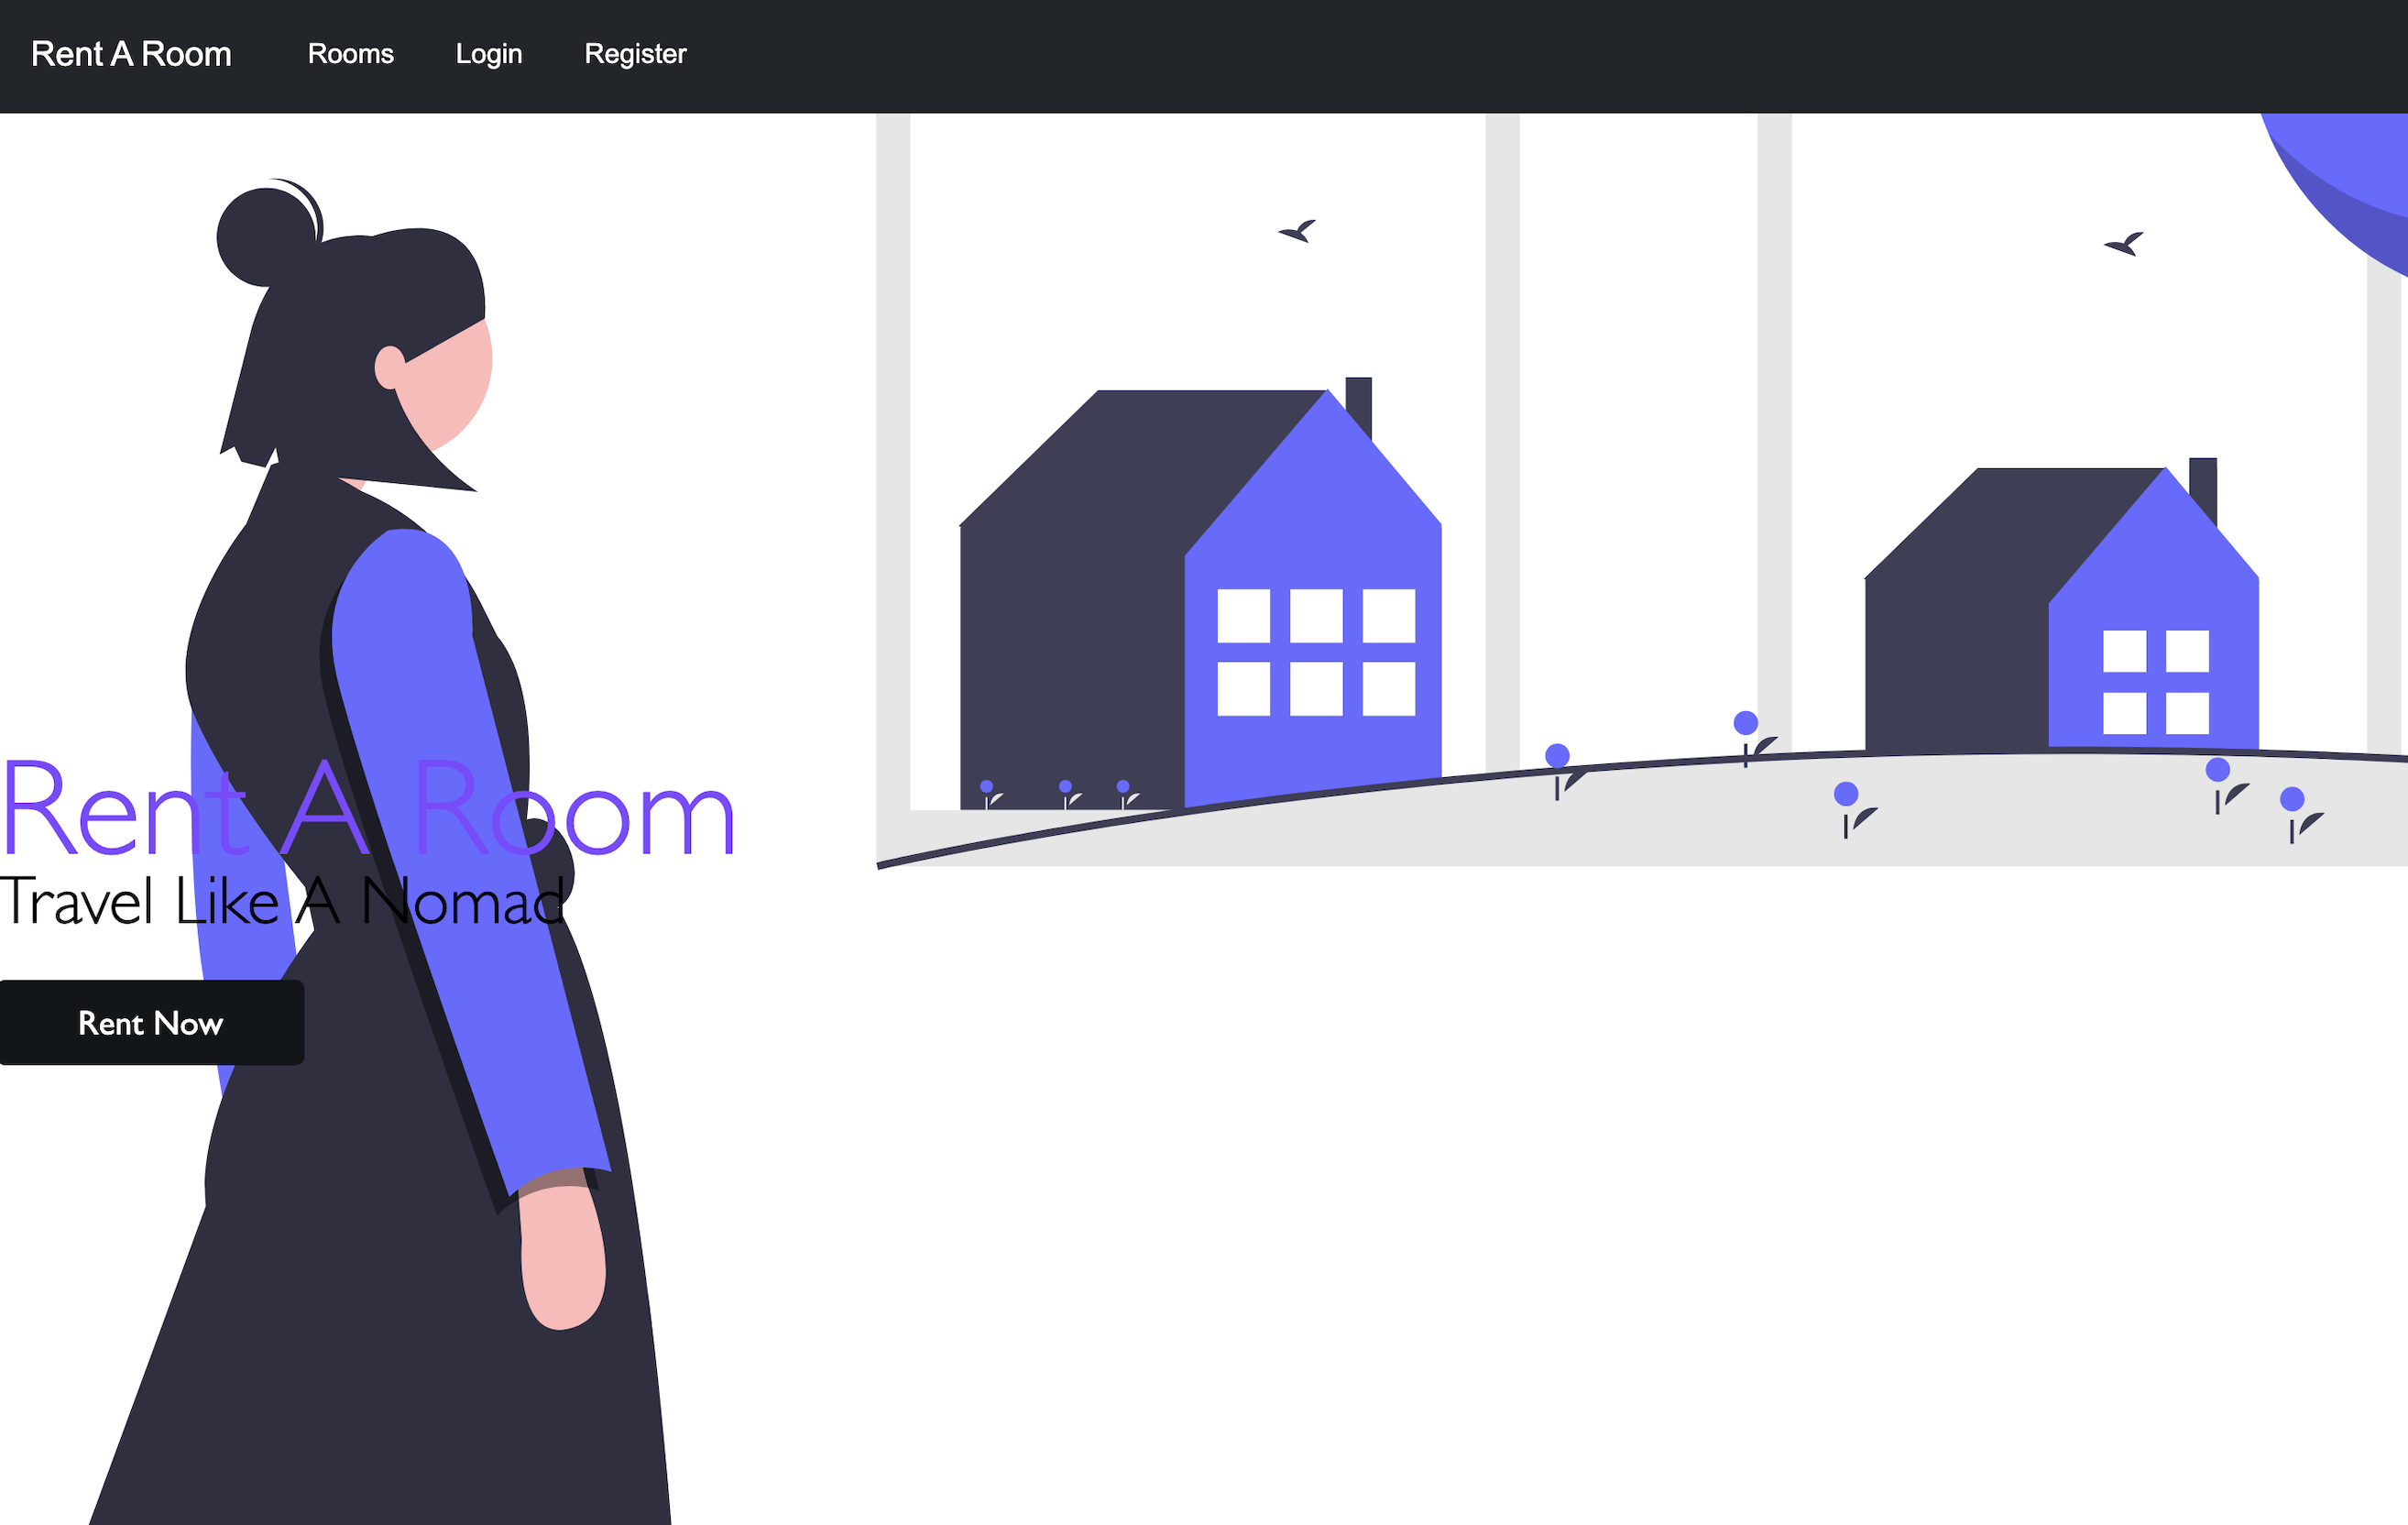 Before: Basic home page with minimal styling and features
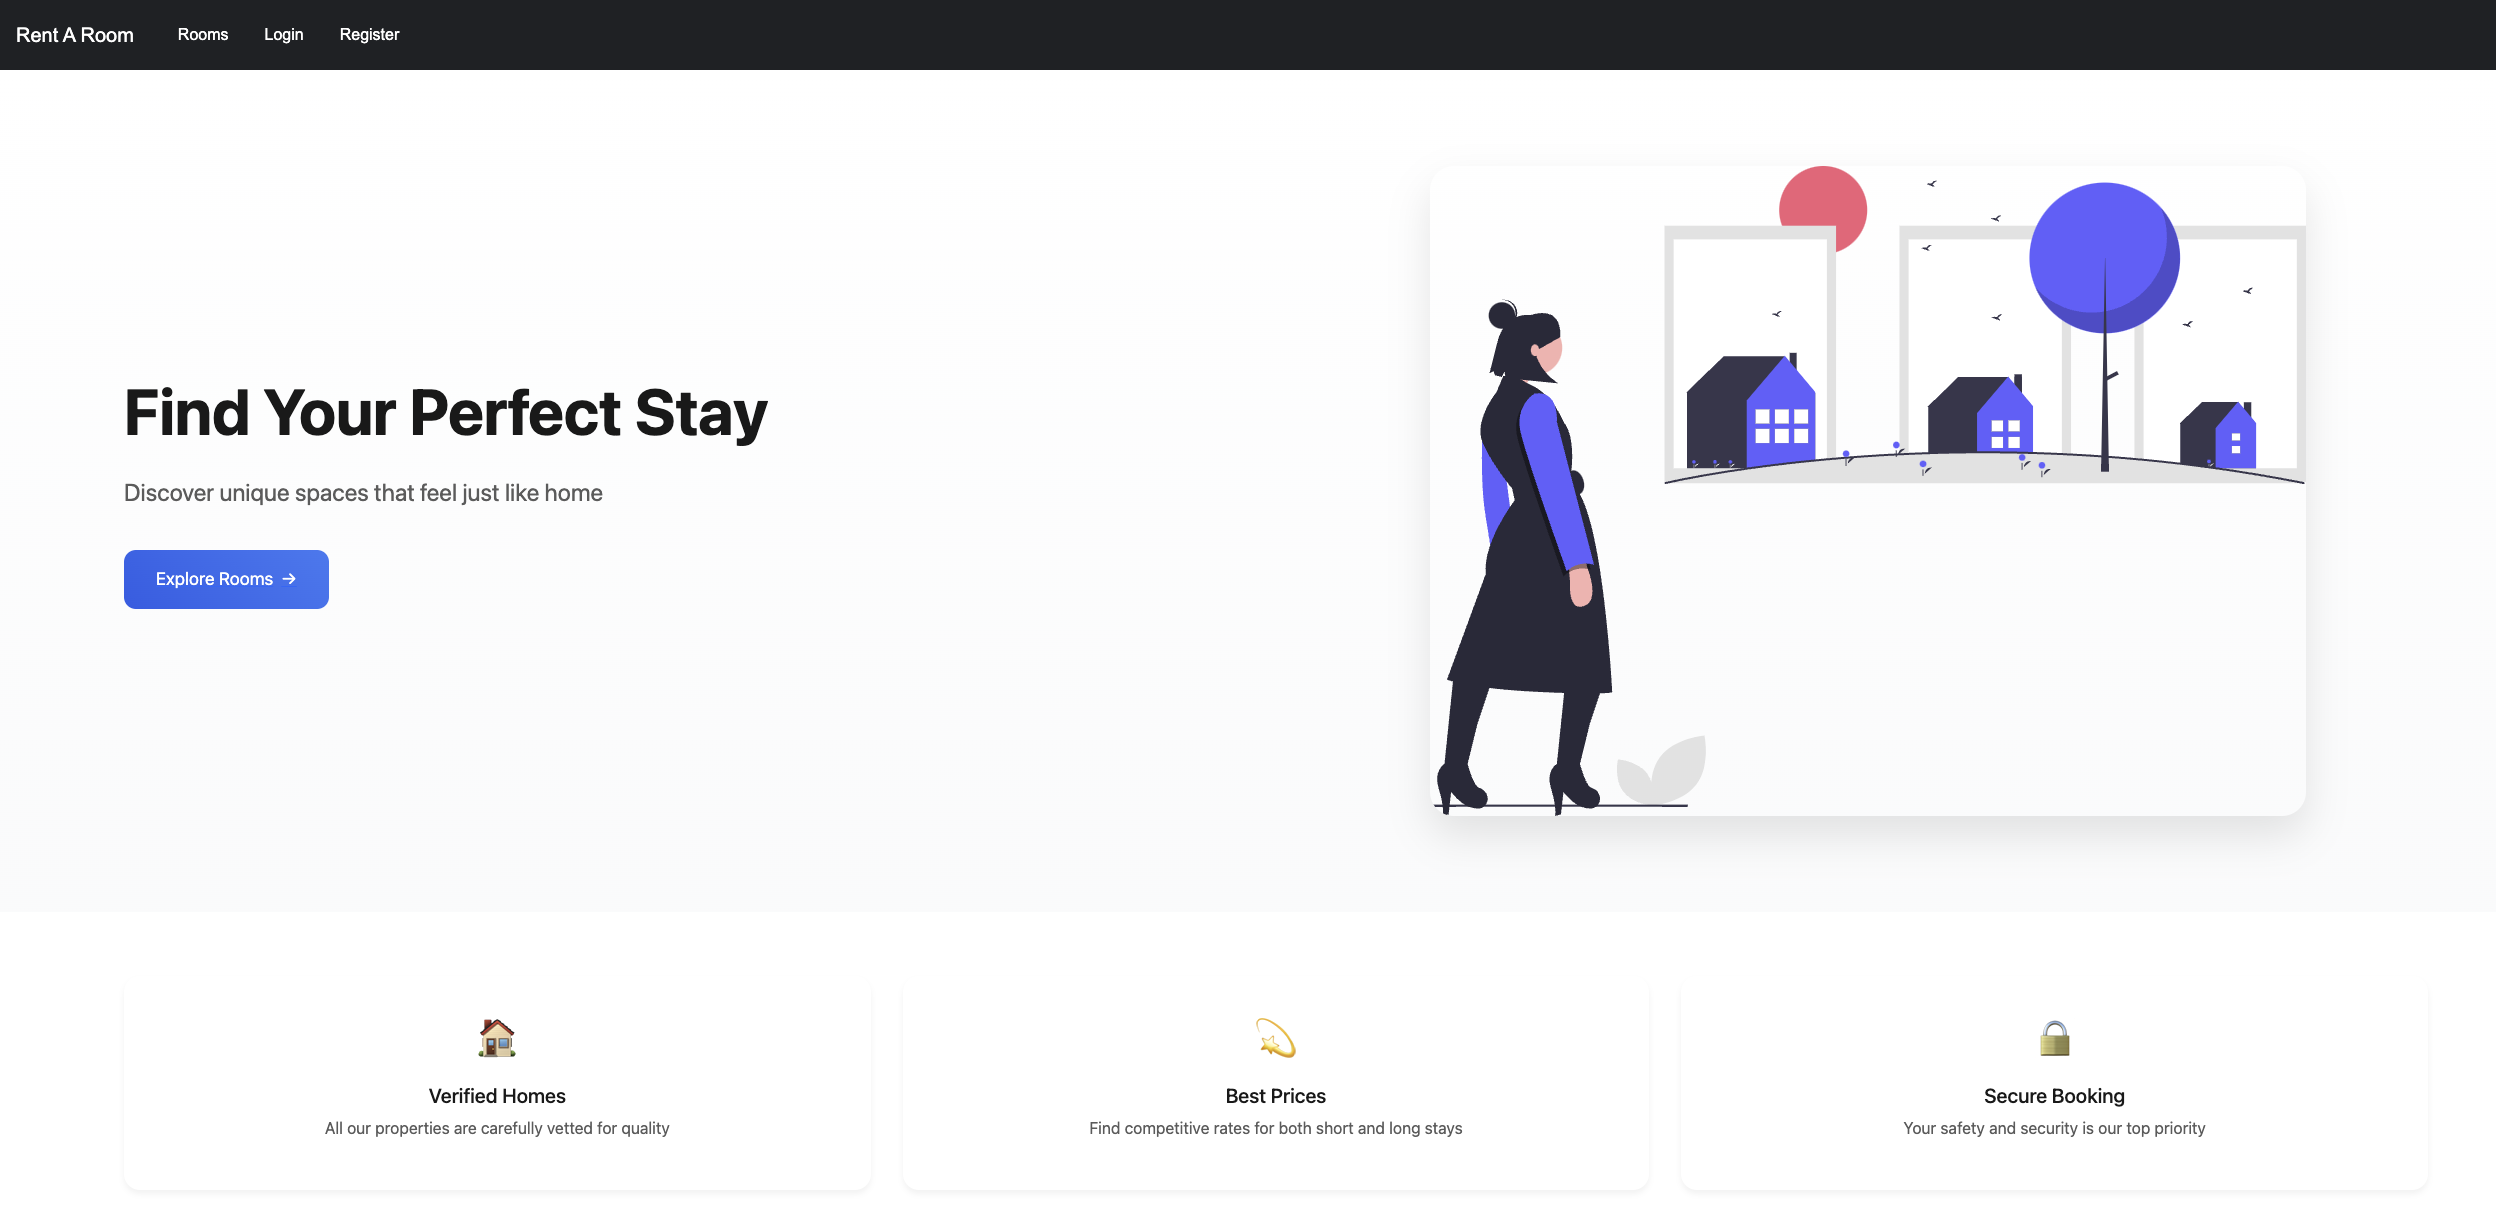 After: Enhanced home page with modern design and feature cards
The Home Page team has successfully transformed the landing page experience, creating a more engaging and informative entry point for users.
2️⃣ Iteration 2: Testing the Security Gate with a Vulnerable Dockerfile
Now let’s test the security gate in our pipeline by using a vulnerable Dockerfile. This will demonstrate how Docker Scout prevents vulnerable images from being deployed to production.
1. Backup the Current Dockerfile
First, let’s save our current Dockerfile as a backup:
cd /workshop/Rent-A-Room
cp Dockerfile Dockerfile.secure
2. Replace with the Vulnerable Dockerfile
Now, let’s use the vulnerable Dockerfile we created in the Docker Scout section:
# Copy the vulnerable Dockerfile to be our main Dockerfile
cp Dockerfile.vulnerable Dockerfile

# Make a small change to trigger a new build
echo "# Triggering build with vulnerable image" >> Dockerfile

# Commit and push the changes
git add Dockerfile
git commit -m "Testing security gate with vulnerable Dockerfile"
git push origin main
3. Monitor the Pipeline Execution
Navigate to the AWS CodePipeline console to watch your pipeline execute:
echo $PIPELINE_URL
You should see the pipeline start and progress through the Source and Build stages. However, when it reaches the Security Scan stage, it should fail because Docker Scout will detect critical and high severity vulnerabilities in the image.
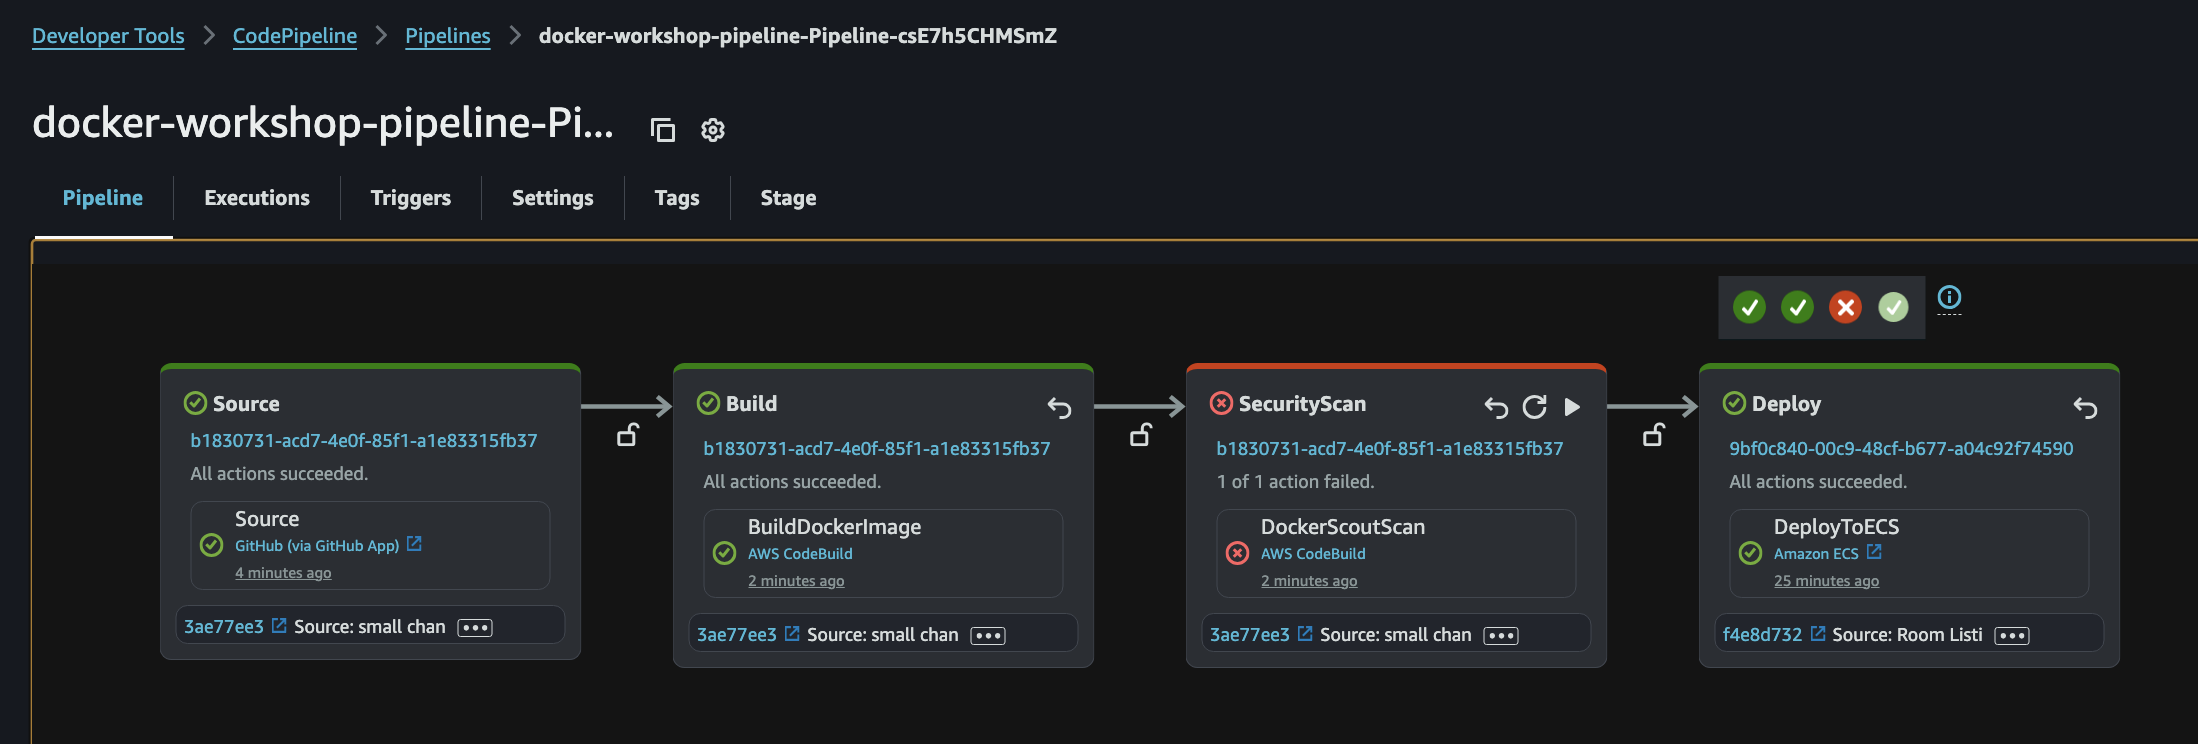
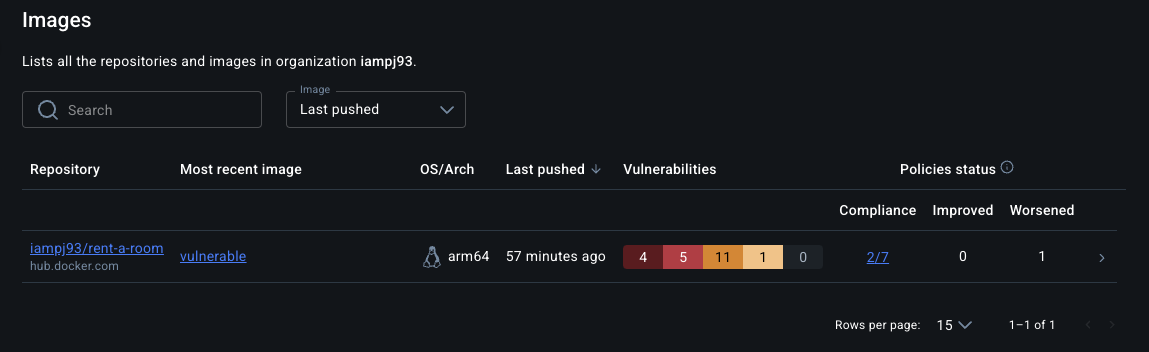
4. Examine the Security Scan Results
Let’s examine the security scan results to understand why the pipeline failed:
# Find the artifact bucket with the correct prefix
ARTIFACT_BUCKET=$(aws s3 ls | grep docker-workshop-pipeline-artifactbucket | head -1 | awk '{print $3}')

# Get the most recent artifact ID
LATEST_ARTIFACT=$(aws s3 ls s3://$ARTIFACT_BUCKET/docker-workshop-pipe/SecuritySc/ | sort -k1,2 | tail -1 | awk '{print $4}')

# Create a temporary directory for extraction
mkdir -p scout-extract
cd scout-extract

# Download the artifact with the correct file extension
echo "Downloading security scan artifact: $LATEST_ARTIFACT"
aws s3 cp s3://$ARTIFACT_BUCKET/docker-workshop-pipe/SecuritySc/$LATEST_ARTIFACT ./artifact.zip

# Extract the artifact
echo "Attempting to extract the artifact..."
unzip -B artifact.zip

# Display the security report if it exists
if [ -f security-report.json ]; then
  echo "Security scan results:"
  cat security-report.json | jq
else
  echo "Could not extract security-report.json."
  ls -la
fi

# Return to the original directory
cd ..
You can also view the results directly in the Docker Scout dashboard:
- Navigate to the Docker Scout dashboard: https://scout.docker.com/
- Select your Dockerhub profile
- Find your
rent-a-roomrepository - Review the security scan results:
- Vulnerability summary
- Package details
- Recommended fixes
5. Understanding Pipeline Failure Protection
An important aspect to note is that even though our pipeline failed at the Security Scan stage, end users were not impacted. This is because:
- The vulnerable image was built but never deployed to the ECS cluster
- The existing containers continued to run and serve traffic
- The load balancer kept routing requests to the healthy containers
This demonstrates a key benefit of our CI/CD pipeline design: failed builds don’t impact production availability. The security gate prevented the vulnerable image from being deployed, protecting both our infrastructure and our users.
# Verify that the application is still accessible with the previous deployment
ALB_DNS=$(aws elbv2 describe-load-balancers \
    --names rent-a-room-alb \
    --query 'LoadBalancers[0].DNSName' \
    --output text)

echo "✅ Application URL: http://$ALB_DNS"
echo "The application is still running with the previous secure deployment"
6. Advanced Deployment Strategies for Production
Our current pipeline uses a basic deployment strategy, but in production environments, you might consider implementing more sophisticated approaches:
Blue/Green Deployments
- Create a completely new set of containers (green) alongside the existing ones (blue)
- Test the new environment thoroughly
- Switch traffic from blue to green once verified
- Allows for immediate rollback by switching back to blue
To implement blue/green deployments with ECS and CodePipeline:
- Create two target groups in your load balancer
- Configure your ECS service to use CodeDeploy for deployments
- Set up a deployment configuration that creates a new task set and gradually shifts traffic
Canary Deployments
- A specific type of blue/green deployment where traffic is shifted in two increments
- Initially route a small percentage of traffic to the new version
- Monitor for any issues or degradation in performance
- If successful, shift the remaining traffic to the new version
- Roll back quickly if problems are detected
To implement canary deployments with ECS:
- Use AWS CodeDeploy with ECS for blue/green deployments
- Select the “canary” traffic routing configuration
- Specify the initial traffic percentage and interval for the canary
- Set up CloudWatch alarms to monitor the deployment
- Configure automatic rollback if alarms are triggered
These advanced deployment strategies would further enhance our pipeline by:
- Eliminating downtime during deployments
- Providing a safe testing environment for new versions
- Enabling fast rollbacks if issues are discovered after deployment
- Reducing risk by gradually exposing changes to users
- Allowing for real-world validation before full deployment
For this workshop, we’re using a simpler deployment model to focus on the core concepts, but these advanced deployment strategies are recommended practices for production workloads.
3️⃣ Iteration 3: Fixing Security Issues and Enhancing Room Listings
Now that we’ve confirmed the security gate is working properly, let’s restore our secure Dockerfile and make additional improvements to the Room Listings page:
1. Restore the Secure Dockerfile
cd /workshop/Rent-A-Room
cp Dockerfile.secure Dockerfile
2. Enhance the Room Listings Page
Now, as a member of the Room Listings team, you’ll implement improvements to the room browsing experience:
echo 'import { useState } from "react";
import "./roomslist.css";

function RoomsList() {
    const [rooms] = useState([
        {
            id: 1,
            name: "Detroit Condo Room",
            description: "This condo sits next to the Ford Field arena where the Detroit Lions play! The room is 15x16 sqft and comes furnished with a bed, nightstand, and television.",
            location: "Detroit",
            state: "MI",
            price: 75,
            imageUrl: "https://images.unsplash.com/photo-1522708323590-d24dbb6b0267?ixlib=rb-4.0.3&auto=format&fit=crop&w=800&q=80",
            amenities: ["WiFi", "TV", "Kitchen", "Parking"]
        },
        {
            id: 2,
            name: "Seattle Waterfront Studio",
            description: "Enjoy stunning views of Puget Sound from this modern studio apartment. Walking distance to Pike Place Market and the Space Needle.",
            location: "Seattle",
            state: "WA",
            price: 120,
            imageUrl: "https://images.unsplash.com/photo-1502672260266-1c1ef2d93688?ixlib=rb-4.0.3&auto=format&fit=crop&w=800&q=80",
            amenities: ["Ocean View", "WiFi", "Gym", "Pool"]
        },
        {
            id: 3,
            name: "Miami Beach Getaway",
            description: "Sun-drenched room with private bathroom in a luxury condo. Just steps from the beach and South Beach nightlife.",
            location: "Miami",
            state: "FL",
            price: 95,
            imageUrl: "https://images.unsplash.com/photo-1560448204-e02f11c3d0e2?ixlib=rb-4.0.3&auto=format&fit=crop&w=800&q=80",
            amenities: ["Beach Access", "WiFi", "Pool", "Spa"]
        }
    ]);

    return (
        <div className="rooms-page">
            <div className="rooms-header">
                <h1>Available Rooms</h1>
                <p>Find your perfect temporary home</p>
                <div className="search-container">
                    <input className="search-input" placeholder="Search by location..." type="text" />
                    <button className="search-button">Search</button>
                </div>
            </div>
            <div className="rooms-grid">
                {rooms.map((room) => (
                    <div className="room-card" key={room.id}>
                        <div
                            className="room-image"
                            style={{
                                backgroundImage: `url("${room.imageUrl}")`,
                                backgroundSize: "cover",
                                backgroundPosition: "center"
                            }}
                        >
                            <div className="price-tag">${room.price}/night</div>
                        </div>
                        <div className="room-details">
                            <h2>{room.name}</h2>
                            <div className="location">
                                <span className="location-icon">📍</span>
                                {room.location}, {room.state}
                            </div>
                            <p className="description">{room.description}</p>
                            <div className="amenities">
                                {room.amenities.map((amenity, index) => (
                                    <span key={index} className="amenity-tag">{amenity}</span>
                                ))}
                            </div>
                            <button className="book-button">Book Now</button>
                        </div>
                    </div>
                ))}
            </div>
        </div>
    );
}

export default RoomsList;' > src/components/roomslist/RoomsList.js && \
echo '.rooms-page {
    min-height: 100vh;
    padding: 2rem;
    background: linear-gradient(to bottom, #f8f9fa, #ffffff);
}

.rooms-header {
    text-align: center;
    margin-bottom: 3rem;
    padding: 2rem 0;
}

.rooms-header h1 {
    font-size: 2.5rem;
    color: #1a1a1a;
    margin-bottom: 1rem;
}

.rooms-header p {
    font-size: 1.2rem;
    color: #666;
    margin-bottom: 2rem;
}

.search-container {
    display: flex;
    justify-content: center;
    gap: 1rem;
    max-width: 600px;
    margin: 0 auto;
}

.search-input {
    padding: 1rem 1.5rem;
    border: 2px solid #e2e8f0;
    border-radius: 12px;
    font-size: 1rem;
    width: 100%;
    transition: border-color 0.3s ease;
}

.search-input:focus {
    outline: none;
    border-color: #3b82f6;
}

.search-button {
    padding: 1rem 2rem;
    background: linear-gradient(45deg, #2563eb, #3b82f6);
    color: white;
    border: none;
    border-radius: 12px;
    cursor: pointer;
    transition: transform 0.3s ease;
}

.search-button:hover {
    transform: translateY(-2px);
}

.rooms-grid {
    display: grid;
    grid-template-columns: repeat(auto-fit, minmax(350px, 1fr));
    gap: 2rem;
    max-width: 1400px;
    margin: 0 auto;
}

.room-card {
    background: white;
    border-radius: 20px;
    overflow: hidden;
    box-shadow: 0 4px 6px rgba(0, 0, 0, 0.05);
    transition: transform 0.3s ease;
}

.room-card:hover {
    transform: translateY(-5px);
    box-shadow: 0 15px 30px rgba(0, 0, 0, 0.15);
}

.room-image {
    height: 250px;
    width: 100%;
    position: relative;
}

.price-tag {
    position: absolute;
    right: 1rem;
    top: 1rem;
    background: rgba(0, 0, 0, 0.7);
    color: white;
    padding: 0.5rem 1rem;
    border-radius: 20px;
    font-weight: bold;
}

.room-details {
    padding: 1.5rem;
}

.room-details h2 {
    font-size: 1.5rem;
    color: #1a1a1a;
    margin-bottom: 0.5rem;
}

.location {
    display: flex;
    align-items: center;
    gap: 0.5rem;
    color: #666;
    margin-bottom: 1rem;
}

.location-icon {
    font-size: 1.2rem;
}

.description {
    color: #4a5568;
    margin-bottom: 1rem;
    line-height: 1.6;
}

.amenities {
    display: flex;
    flex-wrap: wrap;
    gap: 0.5rem;
    margin-bottom: 1.5rem;
}

.amenity-tag {
    background: #f7fafc;
    color: #4a5568;
    padding: 0.3rem 0.8rem;
    border-radius: 20px;
    font-size: 0.9rem;
}

.book-button {
    width: 100%;
    padding: 1rem;
    background: linear-gradient(45deg, #2563eb, #3b82f6);
    color: white;
    border: none;
    border-radius: 12px;
    cursor: pointer;
    transition: transform 0.3s ease;
    font-weight: bold;
}

.book-button:hover {
    transform: translateY(-2px);
}

@media (max-width: 768px) {
    .rooms-header h1 {
        font-size: 2rem;
    }

    .rooms-grid {
        grid-template-columns: 1fr;
    }

    .search-container {
        flex-direction: column;
    }

    .search-button {
        width: 100%;
    }
}' > src/components/roomslist/roomslist.css

# Commit and push all changes
git add src/components/roomslist/RoomsList.js src/components/roomslist/roomslist.css Dockerfile
git commit -m "Room Listings Team: Enhance room listings with card design and improved UX along with secure Dockerfile"
git push origin main
3. Monitor Final Pipeline Execution
Navigate back to the AWS CodePipeline console to watch your pipeline execute with the secure Dockerfile and room listings enhancements:
echo $PIPELINE_URL
This time, the pipeline should complete successfully, including the Security Scan stage, and deploy the application to your ECS cluster.
📸 Room Listings Transformation
Let’s see the impact of the Room Listings team’s changes. You can see the updated website by refreshing the previous webpage or by running the following command to get the link to the hosted website:
# Get the load balancer DNS name
ALB_DNS=$(aws elbv2 describe-load-balancers \
    --names rent-a-room-alb \
    --query 'LoadBalancers[0].DNSName' \
    --output text)

echo "✅ Application URL: http://$ALB_DNS"
 Before: Simple list of rooms with basic information
 After: Modern card-based design with images, amenity tags, and improved visual hierarchy
The Room Listings team has successfully transformed the browsing experience, making it easier for users to find and compare rooms that meet their needs.
🔍 Understanding the Security Gate
Let’s take a closer look at how the security gate is implemented in our pipeline. The key configuration is in the Docker Scout CodeBuild project:
build:
  commands:
    - echo Running Docker Scout security scan...
    - docker pull $DOCKER_USERNAME/rent-a-room:$IMAGE_TAG
    # Run Docker Scout with security gates
    - >
      docker run --rm
      -v /var/run/docker.sock:/var/run/docker.sock
      -u root
      -e DOCKER_SCOUT_HUB_USER=$DOCKER_USERNAME
      -e DOCKER_SCOUT_HUB_PASSWORD=$DOCKER_TOKEN
      docker/scout-cli cves $DOCKER_USERNAME/rent-a-room:$IMAGE_TAG
      --exit-code --only-severity critical,high
The key parameters are:
--exit-code: Causes the command to return a non-zero exit code if vulnerabilities are found--only-severity critical,high: Only considers critical and high severity vulnerabilities
This configuration creates a security gate that prevents images with serious vulnerabilities from proceeding through the pipeline to deployment.
Customizing Security Gates
You can customize the security gates based on your organization’s risk tolerance:
--only-severity critical- Only fail on critical vulnerabilities--only-severity critical,high- Fail on critical and high vulnerabilities--only-severity critical,high,medium- Stricter policy that fails on medium vulnerabilities too
By implementing security gates, you ensure that security is an integral part of your CI/CD process, not just an afterthought.
🏢 Real-World Benefits of GitOps and DevOps
The approach we’ve demonstrated offers numerous benefits for real-world development teams:
1. Team Autonomy
Different teams can work on different parts of the application without stepping on each other’s toes. The Home Page team and Room Listings team were able to make changes independently.
2. Continuous Integration
Each change is automatically built, tested, and deployed, ensuring that integration issues are caught early.
3. Deployment Consistency
The same pipeline is used for all changes, ensuring that every deployment follows the same process and meets the same quality standards.
4. Security by Default
Docker Scout automatically scans images for vulnerabilities, making security an integral part of the development process.
5. Rapid Feedback
Teams get immediate feedback on their changes, allowing them to iterate quickly and respond to user needs.
🎮 Interactive Challenge: Customize Your App Further
Now that you understand how the CI/CD pipeline works, try one of these fun customizations:
- Change the Color Scheme: Modify the CSS to use your favorite colors
- Add a New Room: Add another room listing with a unique description
- Update the Logo: Change the navbar brand from “Rent A Room” to something creative
Make your changes, commit them, and watch the pipeline automatically deploy your customized version!
🔄 The Power of Integration: AWS and Docker
This pipeline demonstrates the seamless integration between AWS and Docker technologies:
| AWS Service | Docker Technology | Integration Value |
|---|---|---|
| AWS CodePipeline | Docker Build Cloud | Automated multi-architecture builds |
| AWS CodeBuild | Docker Scout | Integrated security scanning |
| Amazon ECS | Docker Images | Simplified container deployment |
| AWS CloudFormation | Docker Compose | Infrastructure and application as code |
💡 Key Takeaways
Through this workshop, you’ve experienced firsthand how AWS and Docker work better together:
- Accelerated Development: From code to production in minutes, not days
- Enhanced Security: Shift-left security with Docker Scout integrated into the pipeline
- Operational Excellence: Fully automated, repeatable deployments
- Multi-Architecture Support: Build once, deploy anywhere with Docker Build Cloud
- Cost Optimization: Pay-as-you-go model for both AWS and Docker services
🎉 Congratulations!
You’ve successfully built a complete end-to-end CI/CD pipeline that leverages the best of AWS and Docker technologies. This modern approach to application development and deployment will help you deliver secure, scalable applications faster than ever before.
Remember to clean up your resources when you’re done with the workshop to avoid unnecessary charges.